

Sunday, October 31, 2010
Saturday, October 30, 2010
Head(pins) Over Heels
Friday afternoon's torch session went awry and I ended only being able to make headpins - it's a long, uninteresting story. However, the big batch of headpins I made is anything but boring.

I had a laundry list of all the beads I was supposed to make, ho hum blah.
Instead I had to improvise - it was so great to have the time to experiment and goof around at the torch.
Yes, those are wee crows dangling off the ends of headpins.

These little birds are Effetre Black and Double Helix Psyche. Made on the ends of 20 gauge pieces of brass or blackened steel.
I wish you could see just how iridescent they are - some of them just glow violet blue.

There are also ripe berries,

dead leaves,

shiny peas

and a few other little bits of odd glass.
 I think I need to fool around more often.

I had a laundry list of all the beads I was supposed to make, ho hum blah.
Instead I had to improvise - it was so great to have the time to experiment and goof around at the torch.
Yes, those are wee crows dangling off the ends of headpins.

These little birds are Effetre Black and Double Helix Psyche. Made on the ends of 20 gauge pieces of brass or blackened steel.
I wish you could see just how iridescent they are - some of them just glow violet blue.

There are also ripe berries,

dead leaves,

shiny peas

and a few other little bits of odd glass.

Friday, October 29, 2010
Pink Petals

Off mandrel leaves wired into earrings.
This is another one of my basic designs for the upcoming holiday season.

The glass is Cim's crocus with a swirl of Double Helix Aurae.
If you have not tried this glass combo get up and run to your torch and give it a go, it's spectacular.
Just in case you haven't already seen this - allow me to amuse you.
Thursday, October 28, 2010
Black Roses Bracelet
I made a big batch of iridescent black roses, and rosebuds, on the ends of brass headpins and then wired them together onto a floral charm bracelet.

The roses are plain old black glass that was rolled in Double Helix Triton coarse frit before shaping. The leaves and some of the buds are transparent emerald that was also decorated with Triton frit.

Above is the face side of the blooms and their backsides are below.

I love winding the headpins into tendrils.
The brass wire is incredibly soft when it comes out of the kiln. It bends like butter.

Here's an up close look at one of the rose buds. This was simply a round headpin that was given a little twist, and pull, with a pointy pair of tweezers to form the little spiral tip.

The bracelet is in the gift shop of the Memorial Art Gallery in Rochester, New York.
Wednesday, October 27, 2010
Green Peas & Butter Balls
It's late October, that's when a beadmakers thoughts turn to holiday production...
Seriously, I need to make sixty pairs of earrings in the next two weeks and then another sixty or so pairs by the first of December. Someone shoot me now.
These pairs show off two of my basic designs for the coming season of chaos. I find it helps to have a half a dozen templates and then get going. There's no time to design as you go...

Butter Balls - new earrings for the gift shop at the Memorial Art Gallery.
These beads were made with Cim's Ghee and have raised trails of Double Helix Aurae.
The metals in the Aurae left some lovely ancient looking webbing on the surface of the opal yellow glass.
Just look at those hand hammered ear wires and head pins. They are all mine baby.

 Green Peas - also at the Memorial Art Gallery shop.
The peas are Cims Olive green glass with some chunky copper green frit melted in. I made these beads as headpins on the ends of 16 gauge brass wire. It's my new favorite way to make simple dangles for jewelry.
The headpins and ear wires are brass. There are a few tiny, tiny green/black pearls slung on for fun.

Time to get my butt downstairs and start hammering out 120 pairs of ear wires.
Seriously, I need to make sixty pairs of earrings in the next two weeks and then another sixty or so pairs by the first of December. Someone shoot me now.
These pairs show off two of my basic designs for the coming season of chaos. I find it helps to have a half a dozen templates and then get going. There's no time to design as you go...

Butter Balls - new earrings for the gift shop at the Memorial Art Gallery.
These beads were made with Cim's Ghee and have raised trails of Double Helix Aurae.
The metals in the Aurae left some lovely ancient looking webbing on the surface of the opal yellow glass.
Just look at those hand hammered ear wires and head pins. They are all mine baby.


The peas are Cims Olive green glass with some chunky copper green frit melted in. I made these beads as headpins on the ends of 16 gauge brass wire. It's my new favorite way to make simple dangles for jewelry.
The headpins and ear wires are brass. There are a few tiny, tiny green/black pearls slung on for fun.

Time to get my butt downstairs and start hammering out 120 pairs of ear wires.
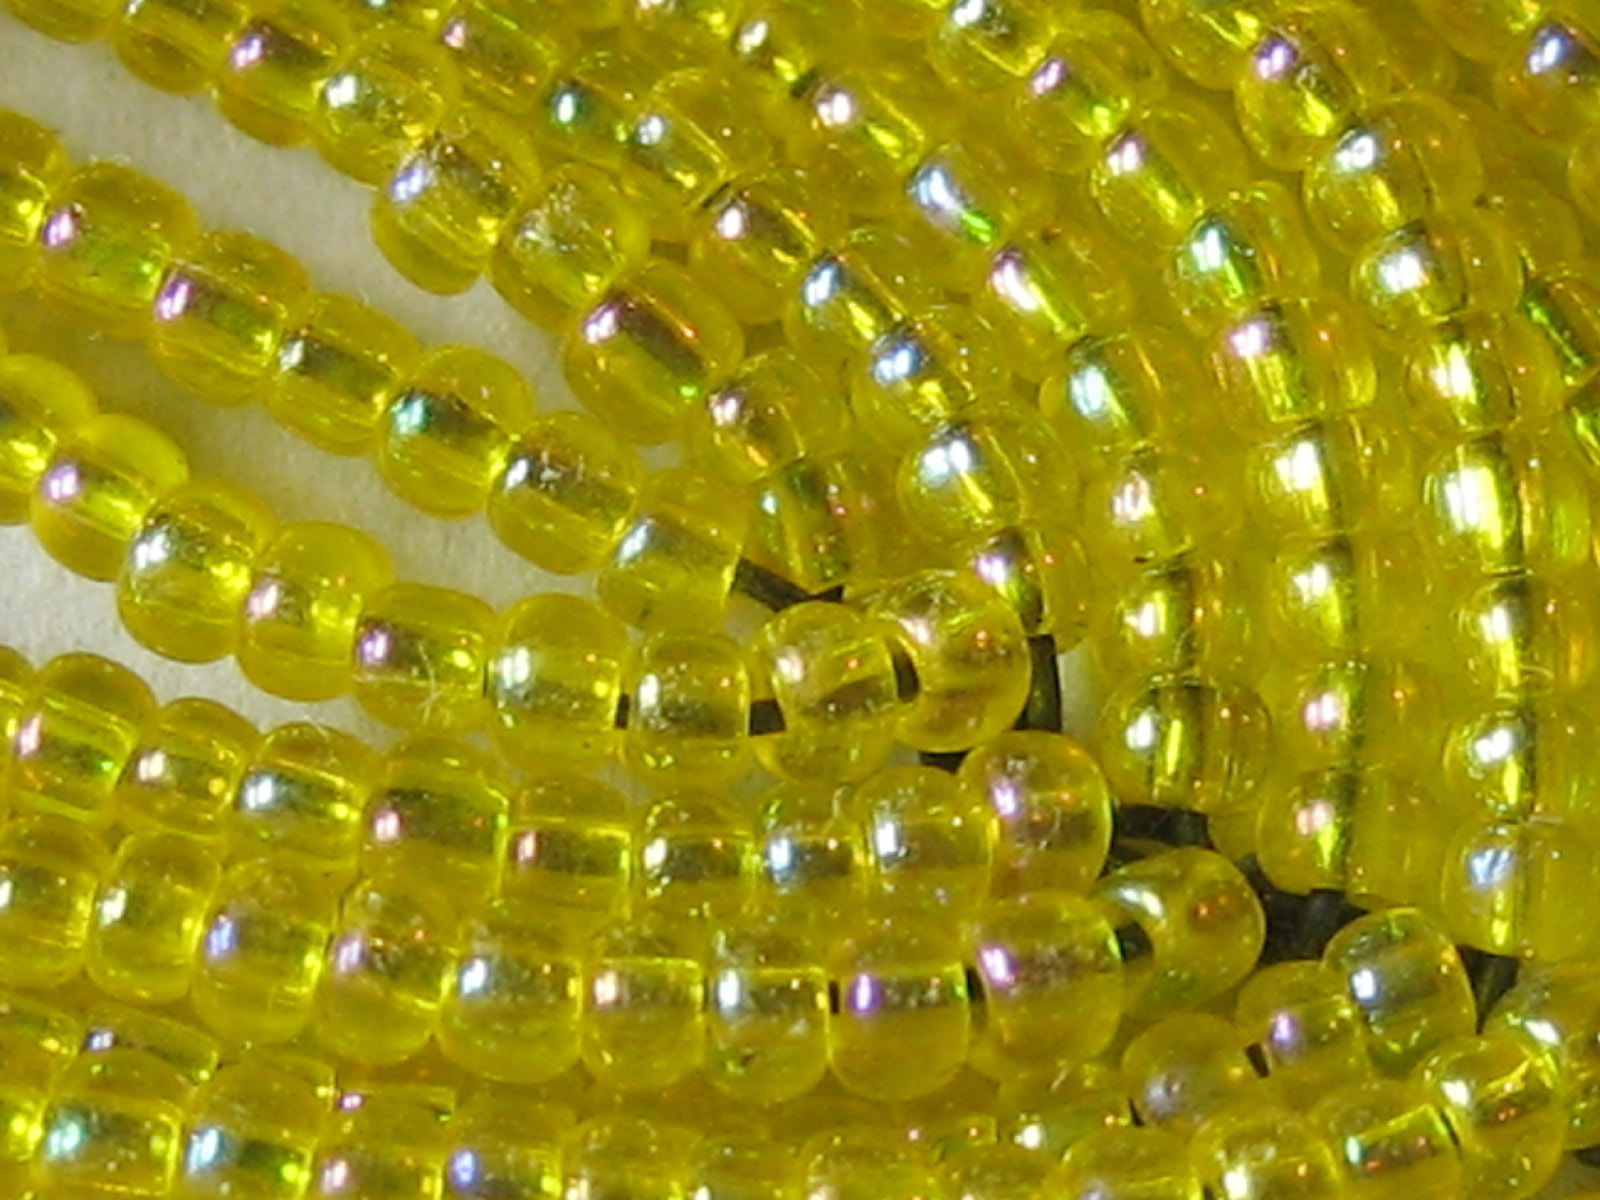
Strange Find
It was a strange and wonderful day yesterday. It was weirdly warm. It's rare for the temperature to reach almost 80 here in November.

The leaves are just past their peak in color and half of them have fallen to the ground. In the piles of all that color I found this very unnatural leaf. It was sitting on top of a carpet of crazy red and orange maple leaves.

It's about 2 1/2 inches long and made with hundreds of iridescent yellow, glass, seed beads.
It's probably from some antique French beaded bouquet - but how did it ever end up where it did.
I guess everything has to be somewhere.
Two of them would make a great pair of earrings.

A milkweed leaf doing it's best to look like its fancy, French cousin.

The leaves are just past their peak in color and half of them have fallen to the ground. In the piles of all that color I found this very unnatural leaf. It was sitting on top of a carpet of crazy red and orange maple leaves.
It's about 2 1/2 inches long and made with hundreds of iridescent yellow, glass, seed beads.
It's probably from some antique French beaded bouquet - but how did it ever end up where it did.
I guess everything has to be somewhere.
Two of them would make a great pair of earrings.

A milkweed leaf doing it's best to look like its fancy, French cousin.
Tuesday, October 26, 2010
Twisted Sister
I know it's not really a big deal but, for me, making my own ear wires is pretty damn exciting.

The idea that the whole earring is handmade - there are no commercial parts whatsoever - is really appealing.
 The "ancient artifact look" is perfect.
 I want my pieces to look like someone dug them up out of the ground or unearthed them from some tomb.
How ever did I do it?
With the help of Kerry Bogert's book "Totally Twisted."

This book has the best 'how-to' photos you can imagine.
Clear, tools on, beautifully staged pictures that perfectly illustrate her concise, well written instructions.
My homemade ear wires are not perfect, but these are absolutely my very first pairs - and that is a testament to the usefulness of this wonderful how-to book. Not to mention that all of this wire work was learned and I am only on page 9.

The idea that the whole earring is handmade - there are no commercial parts whatsoever - is really appealing.


How ever did I do it?
With the help of Kerry Bogert's book "Totally Twisted."

This book has the best 'how-to' photos you can imagine.
Clear, tools on, beautifully staged pictures that perfectly illustrate her concise, well written instructions.
My homemade ear wires are not perfect, but these are absolutely my very first pairs - and that is a testament to the usefulness of this wonderful how-to book. Not to mention that all of this wire work was learned and I am only on page 9.
Saturday, October 23, 2010
Leafy Bits
Besides the rose shaped glass headpins, like the ones from last Tuesday's post, I also make simple leaf headpins.

Leafy bits with wiry spiral tendrils.
This is why I make my headpins so long - about 6 inches in length.
With all that extra wire they can wrapped into all sort of things, like dangles for earrings.
This little pair of leaves has a base of black glass that was rolled in Raku (iris orange) coarse frit, the wires are brass.

These (below) are Sage glass with Copper Green frit and on copper wire.

They would be charming dangles on a bracelet but these will become earrings.

Here on the North Coast the leaves are almost gone.
I just keep reminding myself that it was a nearly perfect summer and fall, but damn, I loathe winter.
Friday, October 22, 2010
Queen Bee
One of my 'curious old things' is in a really lovely Etsy treasury tonight.

Third row down, third item in. The vintage honeycomb belt buckle.
Thank you Moon and Lion for including my shop in your "Queen Bee" treasury.

Third row down, third item in. The vintage honeycomb belt buckle.
Thank you Moon and Lion for including my shop in your "Queen Bee" treasury.
Thursday, October 21, 2010
Tuesday, October 19, 2010
a Rose is a Rose is a Rose
Three new pairs of rose headpins.
 I am going to write a tutorial for these - as soon as I have worked out all the kinks and am completely comfortable with the process.
 The first pair I torched were the iridescent black ones - love the color. It's course Double Helix Triton frit on a base of plain old Effetre black glass. These have a simple tweezed pinch as the center of the bloom.
 Next came the orange ones, a base of Effetre orange glass with a bit of fine transparent red frit rolled on.
Look closely - the one on the left has a pinched center but the one on the left has a quarter twist center.
I love the wee spiral flourish, it's a nice little improvement to the design.
 Finally, the last pair was made with Opallino Nile Green - which is just like Jadite glass. It is such a booger to work with, alway getting little smoky black trails in it and it is the 'shockiest' glass out there. Ok, so maybe rods of Adventurine filigrana are worse.
In any case, I love these with their little ruffle in the center. After I make a few more pairs and I will be comfortable with drawing it all out for you. I am still deciding on which wire I like best and some other niddling details.
Are you ready to make some headpins? If not, then I have put the black ones and the Jadite green ones into my Etsy Belvedere shop.


Look closely - the one on the left has a pinched center but the one on the left has a quarter twist center.
I love the wee spiral flourish, it's a nice little improvement to the design.

In any case, I love these with their little ruffle in the center. After I make a few more pairs and I will be comfortable with drawing it all out for you. I am still deciding on which wire I like best and some other niddling details.
Are you ready to make some headpins? If not, then I have put the black ones and the Jadite green ones into my Etsy Belvedere shop.
Sunday, October 17, 2010
Pillow Talk
It's been a lovely weekend for changing out seasonal clothing, curtains and bedding,
As the kids would say - I am getting my autumn on.
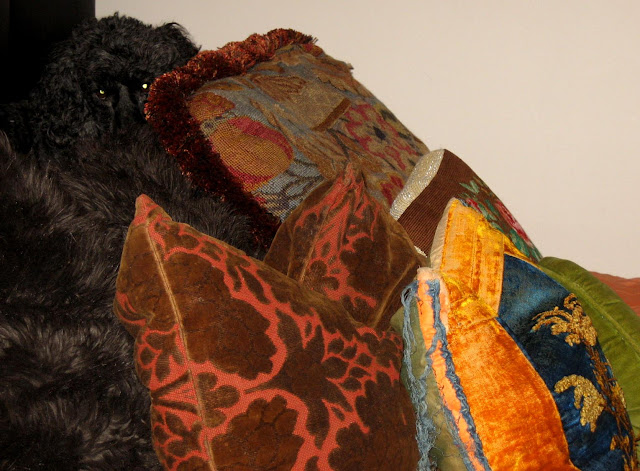
Miss Kiki likes the warm fussy, fuzzy winter pillows.
See her up there? The princess at the top of the faux fur pillow pile?
As the kids would say - I am getting my autumn on.

Miss Kiki likes the warm fussy, fuzzy winter pillows.
See her up there? The princess at the top of the faux fur pillow pile?
Saturday, October 16, 2010
Leaf Tutorial
I make leaves a little differently than anyone else I have seen - so I thought I would share.

The picture above is of the quick set of instructions I drew for myself in one of my bead sketchbooks.
 1. Make a simple, fat oval bead that will fit comfortably in your lentil press. I use a pair of stainless steel ice tongs, which is nice because every leaf gets to be a little different in size.
This is the step where all the decorations are applied. A band of color around the middle will become a vein down the center of the leaf, and a sprinkling of frit never does any harm.
 2. Get everything in your oval bead nice and evenly molten and then press your lentil.
Flame polish off all the chill marks.
This would also be a good time to fuss with the bead holes if they look a little wonky or uneven.
 3. Now it's time to start making your lentil into a leaf.
Begin by spot heating what will be the stem end of the leaf. Grab a little bit of the glass along the edge and pinch and give a slight pull to form a little nub for the stem.
Flash the whole bead through the fire to rewarm it so it won't crack during the next step.
Now spot heat the glass on the other side of your lentil - on both the front and the back - so that you can stretch it out into the tip of the leaf. When it has a nice glow going - grab the leaf, front and back, about one third of the way up towards the mandrel and gently pull. Don't squeeze your tweezers too tightly, this is just a little pinch and pull. I like to use non-serrated and very, very pointy tweezers.
 4. If you want a plain leaf - you're done sculpting the glass. Just do a really good job of annealing your bead and pop it into the kiln without admiring it for too long.
If you want to make a serrated leaf there are a few more steps.
First, evenly reheat the bead so that you don't have any cold spots from all that shaping you just finished. Next you need to make some deep dents into the side of the leaf to begin to form the points. I spot heat the edges and then push in with the blade of a knife - see diagram.
Once you have made all the grooves flash the bead again and give it a good even heating - you have a lot of different stresses going on in there.
At this point it's looking pretty good, you can leave it like this but I like to sharpen up the tips of the points a little bit.

5. To define the tips of the serrations you can gently, gently spot heat them and grab them from the side with your pointy tweezers and give them a little pinch. Don't heat them so much that that you melt away your dent, just enough heat to make it soft enough to give it a squeeze.
Have a dish of water handy for plunging your tweezers - by about the third point they will be starting to stick to the glass because they are getting over heated.
Don't forget to flash the bead around through the flame after every point or your leaf will crack right along the back of the mandrel.
Now give the whole bead a really, really patient annealing and into the kiln it goes.

This trio of leaves have a base glass of light topaz with a thin encasing of Double Helix Aurae that was heavily reduced.
 This is a side view of one of these leaves, you can see they are pretty substantial. They work great in bracelets because they lay so nicely against the wrist.
 This snapshot give you a pretty good look at the way the stem end of the bead is shaped.

left: Double Helix Gaia on a base of Effetre transparent Grass Green and Light Teal
middle: transparent grass green and raku on a base of Petroleum Green
right: transparent Olive, Emerald and Straw Yellow
I would love to hear if anyone out there tries my tutorial.
Show me some pictures in your blog and I will send you one of my leaf beads.
Any questions? I have not written too many of these little tutorials and am not sure how detailed to be. Just ask, I will fill in any blanks.

The picture above is of the quick set of instructions I drew for myself in one of my bead sketchbooks.

This is the step where all the decorations are applied. A band of color around the middle will become a vein down the center of the leaf, and a sprinkling of frit never does any harm.

Flame polish off all the chill marks.
This would also be a good time to fuss with the bead holes if they look a little wonky or uneven.
 3. Now it's time to start making your lentil into a leaf.
Begin by spot heating what will be the stem end of the leaf. Grab a little bit of the glass along the edge and pinch and give a slight pull to form a little nub for the stem.
Flash the whole bead through the fire to rewarm it so it won't crack during the next step.
Now spot heat the glass on the other side of your lentil - on both the front and the back - so that you can stretch it out into the tip of the leaf. When it has a nice glow going - grab the leaf, front and back, about one third of the way up towards the mandrel and gently pull. Don't squeeze your tweezers too tightly, this is just a little pinch and pull. I like to use non-serrated and very, very pointy tweezers.

If you want to make a serrated leaf there are a few more steps.
First, evenly reheat the bead so that you don't have any cold spots from all that shaping you just finished. Next you need to make some deep dents into the side of the leaf to begin to form the points. I spot heat the edges and then push in with the blade of a knife - see diagram.
Once you have made all the grooves flash the bead again and give it a good even heating - you have a lot of different stresses going on in there.
At this point it's looking pretty good, you can leave it like this but I like to sharpen up the tips of the points a little bit.

5. To define the tips of the serrations you can gently, gently spot heat them and grab them from the side with your pointy tweezers and give them a little pinch. Don't heat them so much that that you melt away your dent, just enough heat to make it soft enough to give it a squeeze.
Have a dish of water handy for plunging your tweezers - by about the third point they will be starting to stick to the glass because they are getting over heated.
Don't forget to flash the bead around through the flame after every point or your leaf will crack right along the back of the mandrel.
Now give the whole bead a really, really patient annealing and into the kiln it goes.

This trio of leaves have a base glass of light topaz with a thin encasing of Double Helix Aurae that was heavily reduced.


left: Double Helix Gaia on a base of Effetre transparent Grass Green and Light Teal
middle: transparent grass green and raku on a base of Petroleum Green
right: transparent Olive, Emerald and Straw Yellow
I would love to hear if anyone out there tries my tutorial.
Show me some pictures in your blog and I will send you one of my leaf beads.
Any questions? I have not written too many of these little tutorials and am not sure how detailed to be. Just ask, I will fill in any blanks.
Wednesday, October 13, 2010
Leaves & Berries
Beeble Berries - a set that will be made into a bracelet.

These leaves are made with rods of a striated green glass called Kiwi that are encased in a pale, earthy green transparent named Kelp. Kelp is a fantastic Effetre color for encasing - and it's not expensive. If you don't have any in your glass stash I highly recommend it.
 The berries have a base bead of dark transparent purple with a thick band Double Helix Nyx wrapped over it. The Nyx was given a sprinkling of fine Raku Frit and heavily reduced. I expected them to be much darker but when does Double Helix ever do exactly what you think it ought to do? I know, never.

Here is a snapshot of the leaves and berries that inspired the set.

And, another set of glass leaves and berries that are destined to become a bracelet.
These leaves were made with a base glass of Messy Olive. That was decorated with trails of dark transparent purple and large Raku frit. Then the beads were pressed and shaped into leaves.

Looking back through my glass bead tutorial posts it seems that I have never explained how I make leaves. There are a bunch of drawings in my bead sketchbook already done, all I need is a little time to scan them and add some notes. So, a tutorial on leaves is the plan for tomorrow's blog post.

These leaves are made with rods of a striated green glass called Kiwi that are encased in a pale, earthy green transparent named Kelp. Kelp is a fantastic Effetre color for encasing - and it's not expensive. If you don't have any in your glass stash I highly recommend it.


Here is a snapshot of the leaves and berries that inspired the set.

And, another set of glass leaves and berries that are destined to become a bracelet.
These leaves were made with a base glass of Messy Olive. That was decorated with trails of dark transparent purple and large Raku frit. Then the beads were pressed and shaped into leaves.

Looking back through my glass bead tutorial posts it seems that I have never explained how I make leaves. There are a bunch of drawings in my bead sketchbook already done, all I need is a little time to scan them and add some notes. So, a tutorial on leaves is the plan for tomorrow's blog post.
Subscribe to:
Posts (Atom)


